The
layered bob evolved from the graduated bob, although its square shape is in
complete contrast to the graduated bob. The cutting lines are angled up towards
the jaw line, creating an elongated shape at the back of the head. The internal
layers are convex, which gives a rounded effect and takes the weight off the perimeter
line. The layered bob is not the easiest shape to cut. It involves creating a
geometric outline, which can be difficult to balance. The overall effect is a
geometric shape with a soft, rounded layer and a textured edge.

Haircut guide
Preparation
Complete client and hair
analysis. Choose desired length. Make sure client is gowned and seated
comfortably. This style is divided into three areas: back; sides; and internal layers.
Back
and side areas
Begin the cut at the back
nape hairline .Cut a straight base line using maximum tension and no
graduation. Join the back baseline into the side area. Cut the side area
freehand, using the cutting comb as a guide and allowing for no graduation with
minimum tension. The shape of the side is diagonal, with the shortest point at
the mouth. Create balance by maintaining the correct length and angle throughout
the cut, using the comb as a guide.
Section off the area above
the nape in the same way. Complete both sides.
Internal
shape
Once the perimeter has been
cut, work on the internal shape. Internal layers give the style direction and
body. Take a guideline across the top of the head from the top of the ear to
the crown. Take some hair from the side, allowing the baseline to drop out. Angle
your fingers into a convex shape. To add texture and soften the line, point cut
the ends of the hair. Pull the guideline parallel to the head but maintain
length in the centre. Pull all the hair parallel to the head using the
guidelines from the sides. Work towards the centre back, keeping the convex
shape in the back. Pull the front area parallel, using the side crown
guideline. You will have created a strong corner of weight in the middle of the
section. This is generally rounded out to remove hard lines.
Hold the front top section
between your fingers. Use a safety razor to give the hair a soft edge. Using a
safety razor in this way is an opportunity to personalize the style.

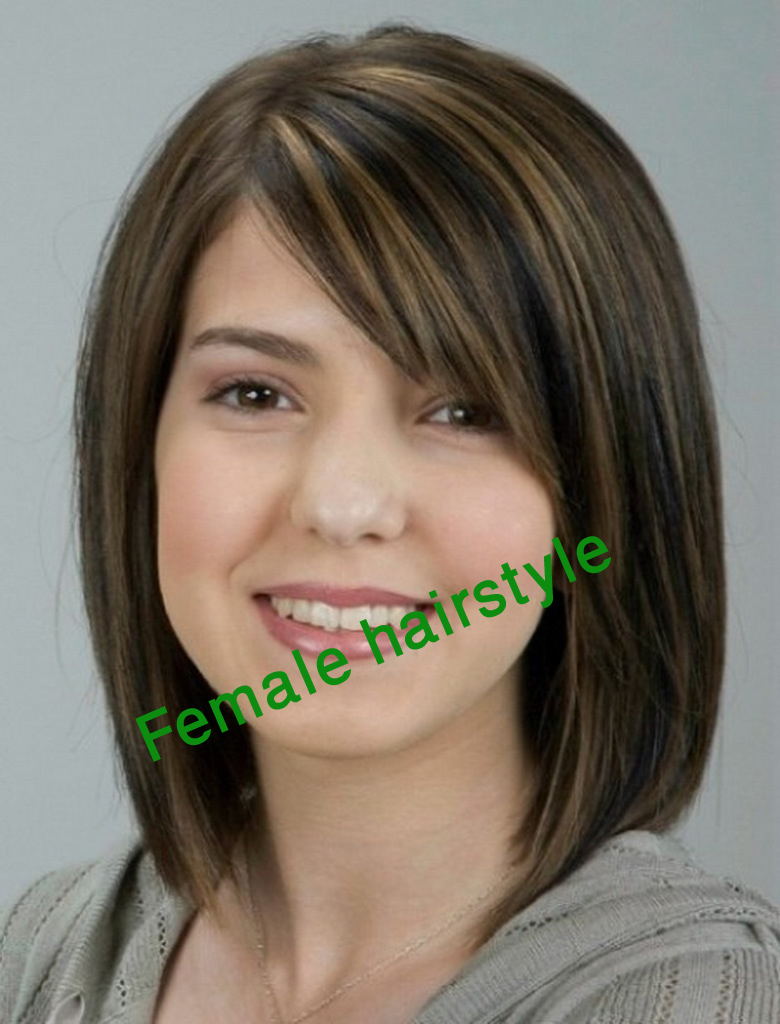
Step 1 Before
you cut
Our
model's hair is medium texture, which is ideal for this haircut. She has an
oval face shape, and her hairlines are flat and even. You should look at all
these client characteristics when you do your initial consultation and
analysis. They influence how you create your haircut and the finished result
you can expect. The layered bob is divided into three sections: back; sides;
and internal layers.
Step 2 Baseline
and Side area
Before
you finish the back area, join in the back and sides areas. Use your comb to
create a diagonal guideline upwards from the baseline behind the ear. Take a
diagonal section from the nape area up to the front hairline. Cut the hair
freehand using minimum tension to create a well-defined outline shape.
Step 3 Nape area
Start
this haircut at the back of the head. Sectioned off the hair from the nape.
Create a straight baseline, using maximum tension. Clamp the hair onto the skin
and use the palm of your hand as a guide. This will help to minimize any
graduation. Always check your client's seating position as you cut. At this
point, it should be slightly forward. In a layered bob, you are creating a
strong, geometric outline and you must achieve balance from the start. Cut the
hair using maximum tension for greater accuracy.
Step 4 Side area
Join
the sides in from the baseline. Use your comb to give you a diagonal guideline.
Follow a diagonal cutting line, cut freehand and use minimum tension to prevent
graduation. Comb down the next section diagonally using the perimeter shape as your
guide. Check the balance of this area before you comb down further sections.
Step 5 Side and
back areas
The
side back area is complete. The side has been cut using minimum tension and the
hair has been allowed to fall from the middle or natural parting into its
natural position.
Note
that the cutting line is very blunt and there is no graduation. Our stylist has
cut the hair from the baseline up to the jaw and corner of the mouth. There is
no fringe.
Cut
your shape following this outline. In a layered bob, it is crucial to get the
balance right from the beginning. Use the comb as your guide when you check
your haircut
for
balance. Repeat this process on the other side.
Step 6 Internal
shape
Take
a guideline across the top of the head, from the top of the ear to the crown.
Use the hair from the sides as a guide to make sure you don't cut into the perimeter.
Cut a convex layer, angling your fingers to create length in the middle of the
layer. Note how our stylist is pulling the hair out from the head and angling their
fingers away. This will create a rounded line. Use the perimeter as a guide to
length.
Step 7 Sectioning
Create
a fan-like sectioning pattern around the head. Work from behind the ear to the
centre back and repeat on the other side. Pull up each section parallel to the
head, being careful to maintain the length of the cut. Keeping length at the
top of the head will help you to create your convex line.
Step 8 Rounding
out and creating the front shape
Pull
the front back to the side and crown area. This will give you a heavy front
shape.
Create
a section behind the back of the ear to the top of the crown. Use this as your
guide. Work towards the front of the hairline using vertical sections. Balance
the cut from the centre, not from the parting. When both sides are complete,
using your curved fingers as a guide, round out any corners that may form a
convex shape.
Step 9 Finished
layering
You
have now completed the layering. You can see here how the outline shape is
still intact but the look is much softer. At this point, the shape is very
versatile and you can complete the haircut by adding your own personal touches.
Step 10 Rezoning
technique
Our
stylist has chosen to soften the edges of the hair using a safety razor. You
can use this technique to bring individuality to your haircut. Cut the ends of
the wet hair using your thumb and the edge of the razor.

Step 11 Front
Section
You
can also cut the front section using a safety razor. This will give your
haircut a soft edge, and create movement and texture. Knowing how to create
texture will allow you to personalize your haircuts. But be careful to discuss
this during the initial consultation when your client is choosing their
finished look.
Step 12 Color technique
We
used 5/0 Rolleston perfect and 6 per cent Walloon for our first color
application.
Apply
the color to mid lengths and ends, stopping between 2cm and 3cm from the scalp.
Develop for 10 minutes with heat or 20 minutes without heat.
Note
that both the client and the stylist are wearing protective clothing.
Step 13 Color
technique
Once
the mid lengths and ends are developed, mix fresh color and apply it to the
root area. Starting at the crown, work down to the nape, then from the crown to
the front hairline. Be careful to achieve an even distribution of color over
the head.
Develop
again for 15 minutes with heat or 30 minutes without heat.
Step 14 Final
result
The
hair here has been blow-dried using a round brush (see the section on
blow-drying techniques).
We
achieved our final result using Walla SP styling spray lotion (see styling
products). The product was sprayed into the root area to create volume and root
lift.


